Assignment 2: Vehicle
Animated Vehicle - Jon Scott:
Task 1 – Poly model and UVW map an approved vehicle with the ability to animate.

initial design of a UV wrap


Third UV design, I decided to make this on Krita using my tablet basing it off of generic camouflage designs I had chosen to make mine red to stand out a bit more but it can easily be altered to other designs such as green or blue.
 UV wrapped tank

Task 2 – Create a short animation showing the vehicle performing its animations.
Below is a short clip of the tank in action driving over a barrel.
Task 1 – Poly model and UVW map an approved vehicle with the ability to animate.
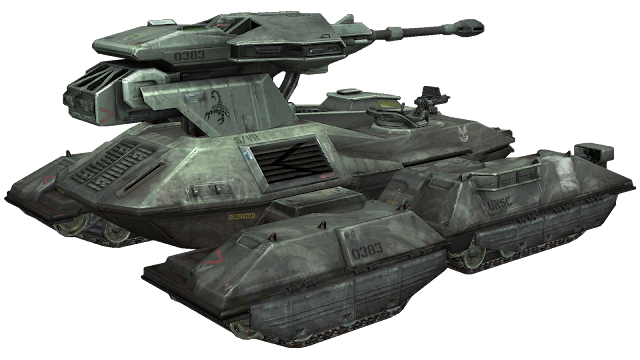
reference image, I wanted to base my design loosely on this.

First design

initial design of a UV wrap


Task 2 – Create a short animation showing the vehicle performing its animations.
Below is a short clip of the tank in action driving over a barrel.
The following video shows the vehicle travelling over a metal beam and a knocked over fence. The vehicle also has the tracks rotating so that they look a bit more realistic and it also shows the direction in which the light will be facing, to see the light in action see the previous video.
Task 3 - Evaluate the work that you have done in five hundred words.
For my vehicle design I decided upon creating a tank as I find it to be an interesting take on an all terrain vehicle and creating the model for this vehicle would be challenging but doable. I began with a few Square blocks as a base and had sculpted them to form the main body, entrance point, the tracks and a mounted cannon. I based my design slightly off of this image here of a UNSC Scorpion class tank from the halo franchise
My design didn't look quite as polished as the ones used in the halo series but I didn't expect that but I had come out with something resembling the core outline but needed a lot more detail adding to it. This would act as my base in which I will add more detail and UV wrap more appealing designs to, I felt that this is a good starting point as it is going to be quite easy to alter the design and the aspects of this vehicle but not keeping it too simple.
For the designs I had chosen to create my own rather than using somebody else's designs, this was more time consuming but it did allow for me to make the work truly my own and also granted me the ability to UV Wrap the designs much easier and create them with my UV wrapping in mind.
I added these designs initially but felt they were quite lacklustre so had decided on further improving on the design of both the tank and the uv wrapping. For this I decided to create a red camouflage skin from scratch using templates other people had for ideas but also making it so it would only take a few minutes if i wanted to change colour to something like green or blue. I had also added extra bits to the model itself such as a working directional light on the front, an entrance hatch on the body, exhaust flaps on the back and a little light on the rear of the body.
For a finishing touch I had added aspects of mud to the design before UV wrapping to make it appear as if the tank had been driving through muddy terrain.
I feel the additions I made towards the end of the design process make the vehicle a whole lot more appealing and highlights the details that had gone into the design. I think given enough time I would have possibly found a way to make the little light towards the rear flash but overall I am very happy with the improvements I made to the initial design and think that designing the new UV wrapped skins were a beneficial action as the previous ones didn't seem as though they would have been aesthetically pleasing.
Compared to previous designs I feel this one in particular had come a long way and the use of lights gives the scene a lot more realism and feel the UV wrapping and additions like Mud add to the scene and give the tank a much better effect.

Comments
Post a Comment